

Table of Contents
- Why Golf Shirts Bunch Up During Your Swing
- What You'll Need to Keep Your Shirt Tucked
- Step 1: Master the Athletic Fit Tuck
- Step 2: Use Shirt Stays or Garters for a Locked-In Feel
- Step 3: Choose Durable Golf Shirts for Broad Shoulders
- Golf Shirt Length Guide: Finding the Right Fit
-
Best Tucking Techniques for Athletic Fit Shirts
- Body Type Considerations: Why One Tuck Does Not Fit All
- The Military Tuck (Best for V-Taper and Athletic Builds)
- The Tuck-and-Twist Method (Best for Shirts with Extra Length)
- The Layering Tuck (For Those Who Wear an Undershirt)
- The Silicone Grip Trick (For Trousers Without Built-In Grippers)
- How to Test Your Tuck Before the Round
- Course Etiquette and Final Thoughts
- Frequently Asked Questions
Last Updated: September 6, 2026
Why Golf Shirts Bunch Up During Your Swing
Shirts bunching during golf is a fitment problem, not a behavior problem. When you rotate through a golf swing, your torso extends and twists while your shirt stays static, pulling the hem up and out of your waistband. The root causes are almost always a shirt cut too straight or boxy for your frame, a fabric with too much surface friction against your trousers, or a tuck that relies on tension alone instead of grip.
A common mistake is blaming the swing. Even a smooth rotation generates enough force to dislodge a standard tuck, which is why the fix starts with how the shirt fits your shoulders and torso before you ever address the tuck itself.
Most guides get this wrong by recommending you simply "tuck tighter." That fails because belt tension alone cannot fight the vertical pull of a full shoulder turn. You need a combination of the right shirt cut, the right fabric, and a physical anchoring system.
What You'll Need to Keep Your Shirt Tucked
Before stepping onto the first tee, gather a few items that make the difference between a shirt that stays put and one you are constantly tugging.
- A golf or performance polo with an athletic cut and a longer tail in the back
- Shirt stays or shirt garters with silicone grippers or clip attachments
- A belt you can cinch without creating a pressure point
- Flat-front trousers or shorts with a mid-rise waistband
- Moisture-wicking fabric that does not cling to your undershirt
The single most overlooked item is the undershirt. A loose cotton undershirt creates a second layer of fabric friction that grabs your polo and pulls it out. Switch to a fitted, moisture-wicking undershirt or skip it entirely.
Step 1: Master the Athletic Fit Tuck
The athletic fit tuck starts with a shirt that actually fits your shoulders. If your polo is tight across the back or shoulders, it will ride up the moment you rotate into your backswing. A shirt cut for an athletic build gives you room through the shoulders and chest while tapering at the waist, so there is no excess fabric to gather and escape.
Start by putting the shirt on and checking the shoulder seam. It should sit at the edge of your shoulder bone, not creep toward your neck. Then check the torso: you want a slim fit through the midsection that follows your natural waistline without pulling across the chest. Excess fabric in the lower back is what creates the balloon effect that pops out on your follow-through.
To execute the tuck, lift your arms overhead and reach toward the sky before tucking. This fully extends your torso so you tuck the shirt at its longest point. Then, pull the fabric smooth from the back forward, and secure your belt over the shirt. Finally, bend side to side and rotate your torso a few times to test whether the shirt stays seated. If it lifts, the shirt is either too short or too boxy for your frame.
Step 2: Use Shirt Stays or Garters for a Locked-In Feel
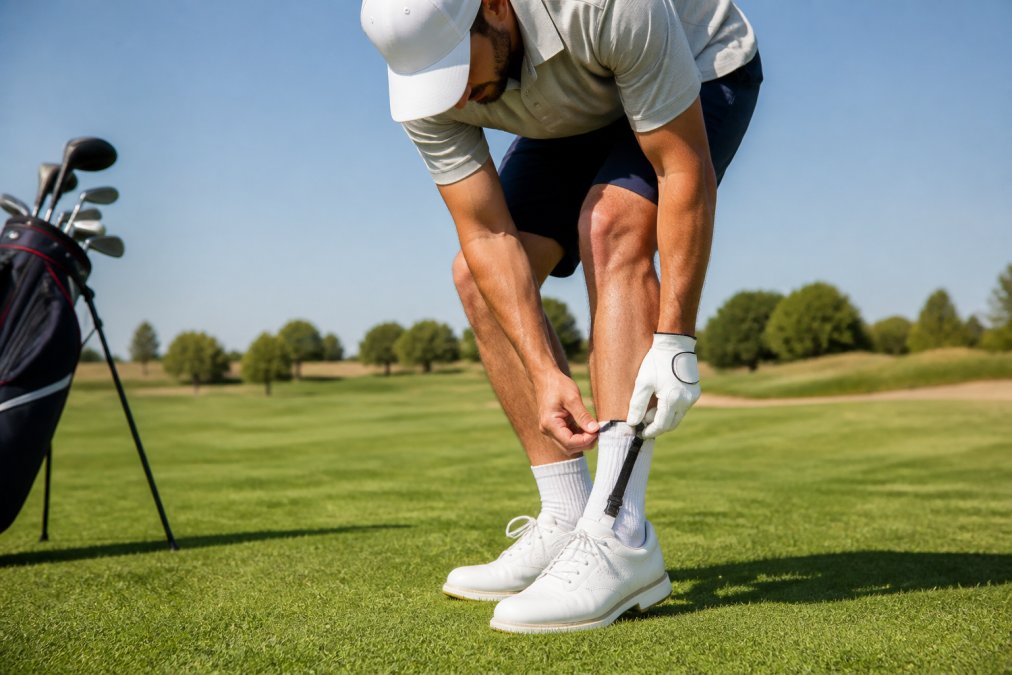
Shirt stays are the most reliable solution for shirts bunching during golf, and they work by anchoring your shirt hem to your socks or the bottom of your trousers. They create a constant downward tension that keeps the shirt from riding up no matter how aggressive your swing rotation gets. But not all shirt stays are equal, and the right choice depends on your body type and the trousers you wear.
Types of Shirt Stays and How They Differ
There are three main types of shirt stays, each with trade-offs for golf:
- Clip-style stays: These attach to your socks with a metal or plastic clip and clip onto your shirt tail. They are the most common and affordable, but the clips can slip on smooth sock fabrics or dig into your calf if you have muscular legs. They work best with mid-calf dress socks.
- Strap-style garters with loops: These use an elastic strap that loops around your thigh or the bottom of your foot. The foot-loop version provides more stable tension because it does not shift when you pivot, but it can be uncomfortable if you wear low-cut socks. The thigh-loop version stays put but may roll down if you have larger thighs.
- Magnetic or silicone-grip stays: Newer designs use small magnets or silicone strips to grip the shirt without clips. These are less likely to damage delicate fabrics, but they may not hold as firmly during a violent swing, especially if your shirt is made of slick performance material.
For golf specifically, strap-style garters that anchor to your socks are the better choice because they do not shift during your stance and swing. Clip-style stays are a budget-friendly backup, but check the clip tension before your round.
How to Set Up Shirt Stays for Golf
- Put on your socks and trousers first. Shirt stays attach to the sock below the calf, so they need to be on before you tuck your shirt.
- Clip or loop the stay to the front and back of your shirt tail. The front clip should attach near the hem, about 2 inches from the center button placket. The back clip should attach at the center of the tail, about 1 inch above the hem.
- Adjust the tension. The strap should be snug but not tight enough to pull your shoulders forward. A good test: bend side to side and rotate your torso. If the shirt stays seated without you feeling a constant pull, the tension is right.
- Take a few practice swings. This is critical. A full swing generates more force than a simple bend, so test with a driver or a 5-iron before you step to the first tee.
Troubleshooting Common Shirt Stay Problems
- Shirt still rides up on one side: This usually means the clip on that side is not attached to the shirt tail properly. Re-clip it so it grabs the hem, not just the fabric above it.
- Stays pull on your shoulders: The tension is too high. Loosen the strap by an inch or two. You want a light pull, not a constant strain.
- Clips slip off your socks: Switch to strap-style garters with a silicone inner lining, or wear socks with a thicker cuff that gives the clip more to grip.
- Stays are visible under your trousers: Adjust the clip height so it sits below the waistband. If you wear shorts, choose a stay with a low-profile clip that does not bulge.
Material Matters: Why Fabric Choice Affects Shirt Stay Performance
A common mistake is assuming shirt stays work the same on every fabric. They do not. The grip of the clip or silicone depends on the surface friction of your shirt and trousers.
- Cotton polos: Cotton has a natural grip, so clips hold well. However, cotton absorbs sweat, which can make the fabric slippery and reduce grip over time.
- Moisture-wicking synthetics (polyester, nylon): These fabrics are smooth and low-friction, which means clips can slide off more easily. Look for shirt stays with rubberized or silicone-tipped clips that grip slick surfaces.
- Merino wool blends: These have moderate friction and hold clips well, but the fabric is delicate, so use magnetic or silicone-grip stays to avoid pulling threads.
If you wear a moisture-wicking undershirt, it adds a layer that can interfere with the stay's grip on your polo. In that case, attach the stay to both the undershirt and the polo hem so the tension is distributed, or skip the undershirt entirely.
When Shirt Stays Are Not Enough
Shirt stays are a powerful tool, but they cannot fix a shirt that is too short or too boxy. If your shirt tail barely reaches your waistband, the stay will pull it down but create a bulge at your hips. Similarly, if the shirt is too tight across the shoulders, the stay will restrict your rotation and cause discomfort. Always pair shirt stays with a properly fitted athletic-cut polo that has a longer tail.
Step 3: Choose Durable Golf Shirts for Broad Shoulders
For golfers with broad shoulders, the search for durable golf shirts that fit properly is the real battle. Most standard polos are cut on a straight grid, which means a shirt wide enough for your shoulders leaves a tent of fabric around your waist that catches and bunches. The solution is a shirt with an athletic cut that accommodates a wider upper body while tapering through the midsection.
Durable golf shirts for broad shoulders need three specific qualities: a four-way stretch fabric that moves with your swing, a reinforced hem that holds its shape through repeated tucks, and a longer tail that stays seated even when your torso extends. A shirt with these features eliminates the root cause of bunching because there is simply less loose fabric to escape your waistband.
Look for performance fabric blends that include spandex or elastane. These materials stretch during your swing rotation and then return to their original shape, which means the shirt moves with you instead of resisting you. A shirt that survives hundreds of deadlifts without losing its shape will handle a weekend round without issue (peer-reviewed research).
Golf Shirt Length Guide: Finding the Right Fit
Shirt length is the most underrated factor in keeping a shirt tucked. A shirt that is too short simply cannot stay tucked, no matter how good the fit is through the shoulders or how tight your belt is. As a rule of thumb, a golf shirt should extend several inches below your waistband when you are standing straight.
Here is a quick reference for how shirt length should correspond to your height and torso:
| Body Type | Shirt Length (front) | Shirt Length (back) | What It Prevents |
|---|---|---|---|
| Shorter torso | 26-28 inches | 28-30 inches | Excess fabric bunching at the waist |
| Average torso | 28-30 inches | 30-32 inches | Standard pull-out during rotation |
| Tall / long torso | 30-32 inches | 32-34 inches | Hem escaping on the backswing |
| Broad shoulders | True to size, longer tail | +2 inches over front | Fabric gathering under the arms |
The back tail should always be longer than the front (pga.com). This is called a "golf tail" or "tennis tail," and it exists specifically because the back of your shirt lifts more during a swing than the front. When you bend into your address position, the longer back tail stays seated in your trousers while the front remains neat.
To test your shirt length, raise both arms straight overhead. If the hem rises above your waistband, the shirt is too short for golf. If it stays covered, you have the right foundation for a tuck that survives a full round.
Best Tucking Techniques for Athletic Fit Shirts
The best tucking techniques for athletic fit shirts all share one principle: you are managing fabric that already fits correctly. No technique can save a shirt that is too short or too boxy, but with the right cut, a few methods keep everything locked in from the first tee to the eighteenth green. However, the 'best' technique depends on your body type, specifically your torso length and waist-to-chest ratio.
Body Type Considerations: Why One Tuck Does Not Fit All
Your torso length and the difference between your chest and waist measurements determine how much excess fabric you have to manage.
- Long torso, narrow waist: You have more shirt length to tuck, but the fabric tends to pull out from the lower back during rotation. The military tuck (below) is essential to remove side bulk, and you may need a shirt with an extra-long tail.
- Short torso, broad shoulders: You have less fabric to work with, so the tuck must be done at the longest point of your torso. The tuck-and-twist method adds grip without requiring extra length.
- Athletic V-taper (broad chest, narrow waist): This is the classic golfer's build. The waist-to-chest difference can be 6 inches or more, creating a 'tent' of fabric at the waist that bunches. The military tuck is your best friend.
- Straight or rectangular build: You have less excess fabric, so a simple standard tuck may suffice, but you still need a shirt with a tapered waist to avoid a boxy look.
The Military Tuck (Best for V-Taper and Athletic Builds)
The military tuck is the most effective for athletic builds. After putting on your shirt, pinch the excess fabric on each side of your waist and fold it backward, creating a smooth front panel. Tuck the folded fabric into your trousers, then pull the front panel down smooth. This eliminates the side bulk that creates pressure points and works especially well for golfers with a narrow waist and broader shoulders.
Step-by-step:
- Put on your shirt and trousers, but do not button the trousers yet.
- Pinch the excess fabric on your right side, just below your ribcage, and fold it backward toward your spine.
- Repeat on the left side.
- Button and zip your trousers, then tuck the front panel down smooth.
- Pull the back of the shirt down to remove any wrinkles.
- Secure with a belt.
Why it works: The fold creates a flat panel that reduces the amount of fabric that can shift. It also moves the side seams forward, which reduces the 'balloon' effect when you rotate.
The Tuck-and-Twist Method (Best for Shirts with Extra Length)
The tuck-and-twist method works for shirts with a bit more length. After tucking normally, grasp the hem on each side and twist the fabric once before securing it under your waistband. The twist creates a physical lock that resists vertical pull. This is a solid backup when you do not have shirt stays on hand, though it is not as reliable for a full round.
Step-by-step:
- Tuck your shirt normally, ensuring the front is smooth.
- Reach behind your back and grasp the shirt hem on each side, near your hip bones.
- Twist each side inward (toward your spine) one full turn.
- Tuck the twisted fabric into your waistband.
- Pull the front panel down smooth to remove any bunching.
Why it works: The twist creates a friction point that grips the waistband, preventing the shirt from sliding up. It is especially useful for golfers with a short torso who need extra grip without extra length.
The Layering Tuck (For Those Who Wear an Undershirt)
If you wear an undershirt, the layering tuck prevents the two layers from shifting independently. Tuck your undershirt into your underwear or base layer first, then tuck your polo over it. This creates a 'friction sandwich' that reduces the chance of the polo riding up. For best results, use a fitted, moisture-wicking undershirt that does not add bulk.
The Silicone Grip Trick (For Trousers Without Built-In Grippers)
Silicone gripper waistbands on trousers are another layer of defense. Many golf-specific trousers include a thin silicone strip inside the waistband that grips your shirt fabric. If your trousers lack this feature, you can apply a small strip of anti-slip grip tape to the inside of the waistband for the same effect. This is a low-cost DIY hack that works with any tucking technique.
How to Test Your Tuck Before the Round
Whichever technique you use, test it with a full practice swing before you tee off. If the shirt lifts even slightly, adjust the technique or consider a different shirt. A good test is to raise your arms overhead and then bend side to side; if the shirt stays seated, you are ready.
Course Etiquette and Final Thoughts
Keeping your shirt tucked is not just about personal comfort; it is part of golf course dress code etiquette. Most courses in the United States require collared shirts to be tucked in at all times, and repeatedly adjusting your shirt mid-round reads as sloppy, even when your game is sharp (usga.org). A neat, tucked-in appearance signals that you respect the course and the players around you.
The complete system for stopping shirts bunching during golf comes down to three investments: a properly fitted athletic-cut shirt, a reliable anchoring method like shirt stays, and fabric that breathes and stretches with your swing. Skip any one of these and you will be fighting your clothing instead of focusing on your game.
Performance apparel technology has advanced enough that this problem is fully solvable. A shirt with the right combination of stretch, length, and grip eliminates the constant tugging that breaks your concentration on the course. The same shirt that performs during a heavy lift or a long cardio session will hold its position through eighteen holes.
Frequently Asked Questions
Do shirt stays work for golf apparel?
Yes, shirt stays are the most reliable solution for keeping your shirt tucked through a full golf swing. They clip to your socks and the shirt's tail, creating constant tension that prevents bunching. Look for models with silicone grippers inside the clip to prevent slipping on performance fabrics. While they take a few rounds to get used to, most golfers find they eliminate the need to re-tuck entirely.
Are golf shirts supposed to be baggy?
No. A baggy golf shirt is a primary cause of bunching because excess fabric catches and folds during your swing rotation. The correct fit should be slim through the torso without being restrictive, with sleeves that end mid-bicep. When you raise your arms overhead, the hem should stay below your waistband. If you have broad shoulders, look for durable golf shirts designed for athletic builds that taper through the waist.
Why does my shirt ride up when I swing a golf club?
Your shirt rides up because of fabric friction against your torso combined with the rotational force of your swing. As you rotate, the shirt twists and the tail pulls upward. Solutions include choosing moisture-wicking performance fabrics that grip less, using a tuck technique that leaves no slack, and using shirt stays to anchor the hem. A properly fitted shirt that is long enough in the torso also helps prevent this common issue.
What is the best fabric to prevent shirt bunching?
The best fabrics are lightweight performance blends, typically polyester or nylon mixed with spandex. These offer stretch and have a smoother surface that reduces friction against your skin and waistband. Avoid 100% cotton, which grips and twists. Look for moisture-wicking properties to keep the fabric from sticking to your skin when you sweat. A performance fabric that maintains its shape wash after wash will also keep its tailored fit longer.
The challenge is finding activewear that delivers on all three fronts without sacrificing style. Kritter Komfort builds shirts with breathable, stretch-friendly fabrics and durable stitching, cut true to size for athletic builds that transition from the gym to the golf course without bunching mid-swing. Our machine-wash friendly designs hold their shape and keep you looking sharp wherever you play. Get started with Kritter Komfort and keep your shirt where it belongs.